I felt the length and the look of the dress would be a bit off by a hem, so I’m going to try to get away without one, however, I did learn how to use my own bias binding and I’m updating today with lots and lots of pics and instructions on how I did it. Hopefully, it’s not too hard to follow.
To start, the pics may be a little blurry since I only used my cell, but I hope that you are able to see and understand. Also, I’m not the best at the measurements, so bare with me if you can. Here is the rundown using a sample.
BTW, Make sure you cut off the seam allowance around the neck and armhole edges before placing the binding. I actually lost the instructions to the dress, so I did everything basically my way. I marked off 1.5cm all around the edges, and cut it off.
- The first thing I did was fold the fabric at an angle to cut my bias strips. In one of my sewing books the measurements of 2 3/4in(7cm) were given, which was too big, but I followed the directions and cut out about 6 strips.

- So after the strips were cut, I took out my pins, brought my strips over to the ironing board, and folded one side of the strip so that it measured 1cm. I placed the pins into the strips and through the ironing board measuring 1cm down the length. With the other side of the strips I just turned it over, and pinned it to the ironing board as well. When both sides were pinned I ironed over the pins(maybe this isn’t the best thing to do, but it worked for me) and took to pins out and ironed again. It looked like this.


- After that was finished I folded the strips against the raw neck and armhole edges of my dress(sample here) and pinned it in place with the 1cm side of the biased strip folded along the right side of the fabric.

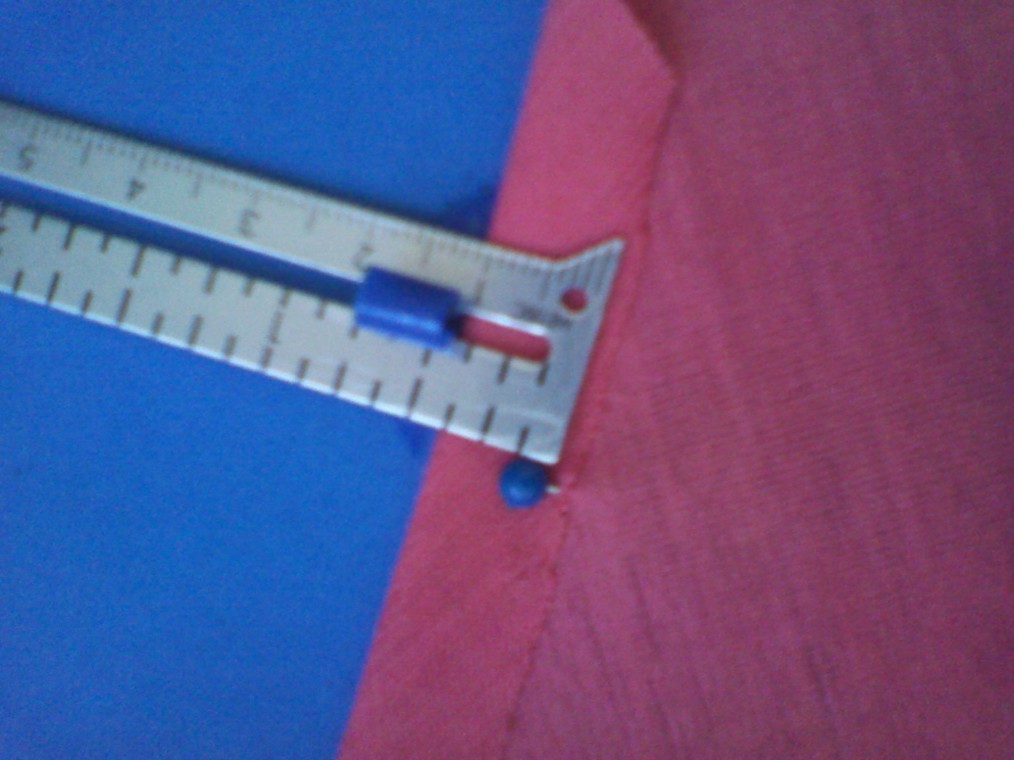
- Then I used my sewing gauge and a water soluble pin to measure maybe 1/4cm(?) and make a dot at the mark on bias strip. *I’m not the best with the measurements, so hopefully you all can see where I made the mark.


- Then I went over to the sewing machine to top stitch and tried to make sure the dot was right in between the middle of the presser foot. Luckily, what helped me most is that the edge of the bias strip falls on the first line on the needle plate(?) so that’s what my eyes followed the entire time. Here’s the pics of that.

- I then adjusted the tension dials both to 3(instead of 4).

- And I sewed along the line, and this is the result of it on the sample and on the dress.


And that was it! I hope this helps in some way. I just started sewing in January, so please bare with me in terms of the terminology, measurements, pics etc. I like to read in books, but I also like to kind of figure it out as I go, and do it in ways that appeal to me. For example, the 1cm measurement I used to fold the bias strip along the edge was from me taking the measurement on an edge of a shirt that I own and using that, along with taking and using the measurement for the stitching line. If there are any questions I’ll try to answer them to the best of my ability.
Also, please excuse the chipped nail polish lol.
if the pics are too big, you can also view them at.
http://sewthankful.wordpress.com/2012/06/17/my-bias-binding-techniquelots-of-pics/
No comments:
Post a Comment